My Contact Details:

Email : samw1984@aol.com
Showing posts with label Cooking. Show all posts

Sunday, 16 October 2011

Things Ive been working on.

Hi All

Just wanted to share a few things Ive been working on this week.

First of is a card I made for my Mams birthday which was on the 10th (She got the greatest birthday present 27 years ago lol she was in hospital having me but I didnt come out till 12:01am so im the 11th!)


Papers used were from the RAK I got from Cheri which is K&CO Urbon Rhapsody.
I also used some of my flowers from my Haul from Wild Orchid crafts. The image was a free one I got with a magazine which I coloured in with my markers.

 I was baking on Friday night trying out some of my new Halloween cookie cutters only only one of my ghosts survived and all of the cats died lol the cats legs and tails kept burning with them being alot thinner than the rest of the cookie. So i just ate the bodies hehe. The icing was white with black food gel but it looked like a baby blue instead of Grey and Navy instead of black!!


Ingredients
175 g plain flour
1tsp Almond flavouring
110 g soft butter
50 g sugar


Method
1. Preheat the oven to 180C/ gas 4. 
2. Put the flour and almond flavouring into a mixing bowl and rub in the soft butter. 
3. Add the caster sugar and bring the whole mixture together to form a stiff dough. Do not add any water, however tempting. 
4. Roll out the dough to about ½ cm thickness and cut into shapes with a cookie cutter. 
5. Place carefully on a baking tray and cook in the oven for 6-10 minutes until pale golden. 
6. Remove from the oven and cool on a wire rack. 


Last night I wanted to scrap but I no longer have a crafting place in the kitchen as we got a new double fridge freezer which goes where my bench was :-( and I am still waiting for Adam to decorate the utility for my craft room and get a radiator put in there as its freezing in there during winter!
So I sat in the front room tv on and the big foot stool I have with my craft mat on top and created the below was quite content but my back was killing leaning over!


 Baby Blue paint was a tester pot from Homebase (not sure if its acid free tho)  Plain white card stock for the background.
 I used alot of my miscellaneous bits and pieces to fill in the clusters. Stickers were from a baby boy sticker pad I got in Wall-mart a few years ago. The White leaf stickers were from Lakeland but doesn't look if they have a craft line anymore - I've had them stickers for about 5 years!
I think this page turned out ok. Still think there is alot of white space tho.
Quick video on youtube of the page sorry i sound terrible im so tired!!!

Thanks all for looking
Sam xx

Sunday, 15 May 2011

Relaxing weekend!

Hope everyone has had a lovely weekend. I have been doing over time all this week and I think I work 53 hours in total normally only do 37.5 so I have been very tired and ratty and mostly taking it out on Adam - opps!
So was defo glad when the weekend was here and boo its Sunday night I am back at work at 7.30 tomorrow. So wish I could win the lottery then never work again and sit and craft all day :-) How totally awesome would that be!!! Never gonna happen but I can dream!!

Last night I was up till the early hours of the morning scrapbooking. I duno why I do it do nothing all day then it comes to 7/8 pm then I get a sudden burst of inspiration and I am there crafting till easily 2.30am! Anyone else a night owl when it comes to crafting?

I made 4 8x8 scrapbook pages and some yummie cookies

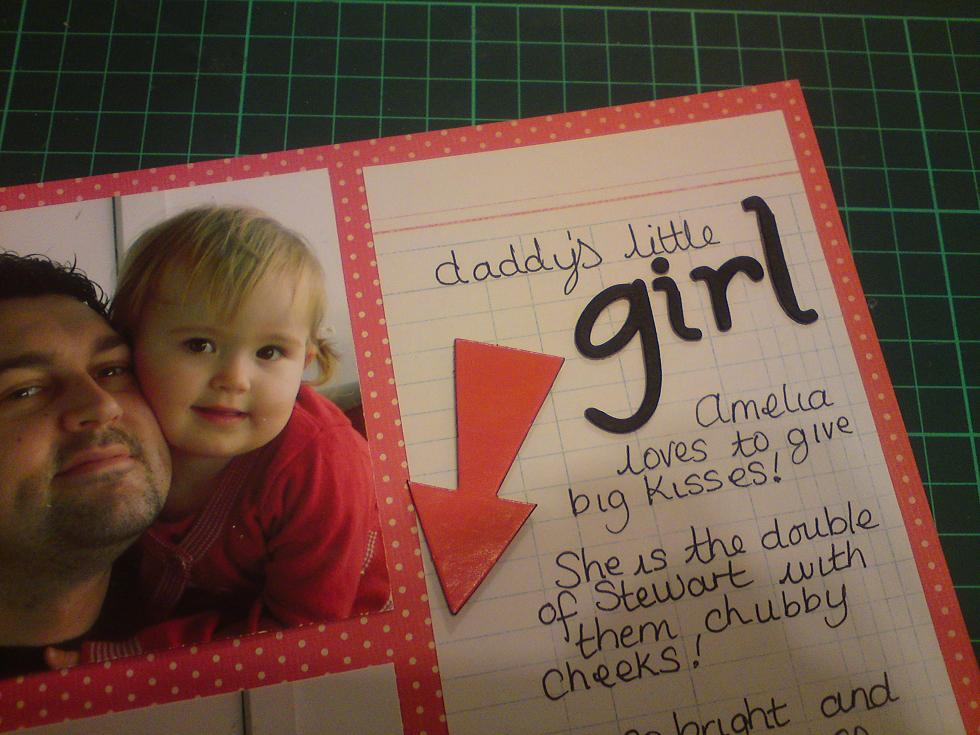
All the pages were for Amelia's scrapbook as I am trying to finish this one off so I can start her new one.


Red Polka Dot and a Ledger Paper from a DCWV paper stack not sure of the name but my friend Andrea across the road gave me them - Thanks Hun :-) its great having a fellow crafter in my street not only do I pinch sugar, her cake mixer (when mine died) she also lets me raid her craft stash when I babysit for her - Best Friend eva!!


No idea what the photo sizes are they were 4 x 6" photos and cut into a square (I think they may have been 10 x 10 cms). The "Girl" Chipboard is the Audrey collection by Mia Road and coloured Black.
Chipboard arrow and lips are from a huge chipboard can I got from WallMart like 4/5 years ago. I did alot of hand writing on this page but wasnt sure it really made sence as it was late and I couldnt really think straight.

My brother build Amelia a big sandbox and a play area in their backgarden for her birthday and these are of her sitting in it! Shame with UK Weather its never really warm and her birthday was in March so she had to have her coat on hehe!

I was soo pleased with this embelishment I made it was a sandcastle using actual sand paper.

Template for this and the inspiration is here only difference I gave my castle two towers - only the best castle for my baby niece :-) There are lots of different templates if you google sandcastle template. I just thought this would be the easiest to cut out of the sandpaper - it was alot easier than I thought sharpened my scissors too but wasnt very good for my rotorary trimmer.
Couldnt find a decent template for the bucket and spade so they are printed from clip art and cut out.


This Easter page was inspired by a page Kristina Werner did on the Basic Inspiration Class No. 1


Papers used are First Edition - Hideaway 6x6 which I got a sample pack from Ebay for only £1.99 I think I might start and do this get the 6x6 sample pack from ebay as some are only £1 and if I like them I can buy the big pads. Chipard letters are Basic Grey not sure of the name of this pack as I lost the insert to box.

This is patterned paper which I printed from google as I wanted it to look like paint splats.
Used plain coloured paper to double mount the photo up.


Absoultley loved this sentiment "I am not messy, I am creative" I just added the last line as it is true :-)

Finally... sorry ive bored you but look at how yummie these cookies are!!


Cornflake cookies recipe.
INGREDIENTS


  • 125g butter, chopped, at room temperature
  • ½ cup caster sugar
  • 1 egg
  • ½ teaspoon vanilla extract
  • 1 cup self-raising flour, sifted
  • 2 cups cornflakes, Crushed (I used crunchy Nut)
METHOD


  • Preheat oven to moderate, 180°C. Lightly grease and line 2 large oven trays.
  • In a bowl, cream butter and sugar together until light and fluffy. Beat in egg and vanilla, then fold flour in.
  • Roll tablespoonfuls of mixture into balls and roll into crushed cornflakes. Arrange on trays about 4cm apart.
  • Bake for 15-20 minutes until golden. Cool on tray for 5 minutes. Transfer to a wire rack to cool completely.

Love to all
Hope you have a great week x

Saturday, 19 March 2011

Cake Journal PDF tutorials

Hi All

As you have seen from previous posts I have attempted to make cakes and cookies before just wanted to share a great opportunity to all other cake/cookie makers out there who are still newbies like me.

I have been following Louise and her great blog for about 4/5 months I think and she is defo one of the best decorators I have seen. Her blog has awesome ideas for all occasions and she is offering the chance to followers to have a selection of her tutorials on PDF for free all you need to do is go to her blog below and follow the instructions.


Please go and have a look at her site and get some super inspiration don't for get Easter and mothers day is coming up!

Monday, 14 February 2011

Happy Valentines Day!

Happy Valentines Day all.

I was very busy this weekend and being as nice as I am I made lots of cupcakes and cookies for my work colleagues.


These are mini Red Velvet Cupcakes with Cream Cheese frosting and mini chocolate hearts on top. I made about 50!! Yes this is a huge egg tray they are in they fit perfect and I put the lid on and it was perfect to transport them too work.

I had never tasted Red Velvet Cupcakes before and they were all over when I was in America in Nov but for some reason I never tried them. I bought a box of the cake mix and the tub of cream cheese frosting from wallmart as they were sealed Duncan Haines. Since I have only been on my new account for 2 months and not many people know me they were a bit wary of trying them!! (which upset me alittle as Id spent all weekend cooking! But my new manager had quite a few and told the rest of the team how nice they were and that I'm not going to poison them - long and short of it they didn't last much longer after that)


I also made some sugar heart cookies with marshmallow fondant on the top they were delicious!!!

Hope everyone is happy and feeling loved today even if your single :-)

Love Sam

Anniversary Card and Cake

30 years ago today my parents were married.

I made them the canvas which I posted last time I also made them a card and a cake (my first attempt at making and decorating a cake!)


This is the card I made for them using papers from Joanna Sheen Backing Paper Pad Victorian Calligraphy and a vintage decoupage picture by Search Press. I used some vintage cream lace, silk ribbon roses misted with Bronze Cosmic Shimmer Mist. I made some hat pins with plain white seamstress pins and glued pearls on and added white peal off numbers.


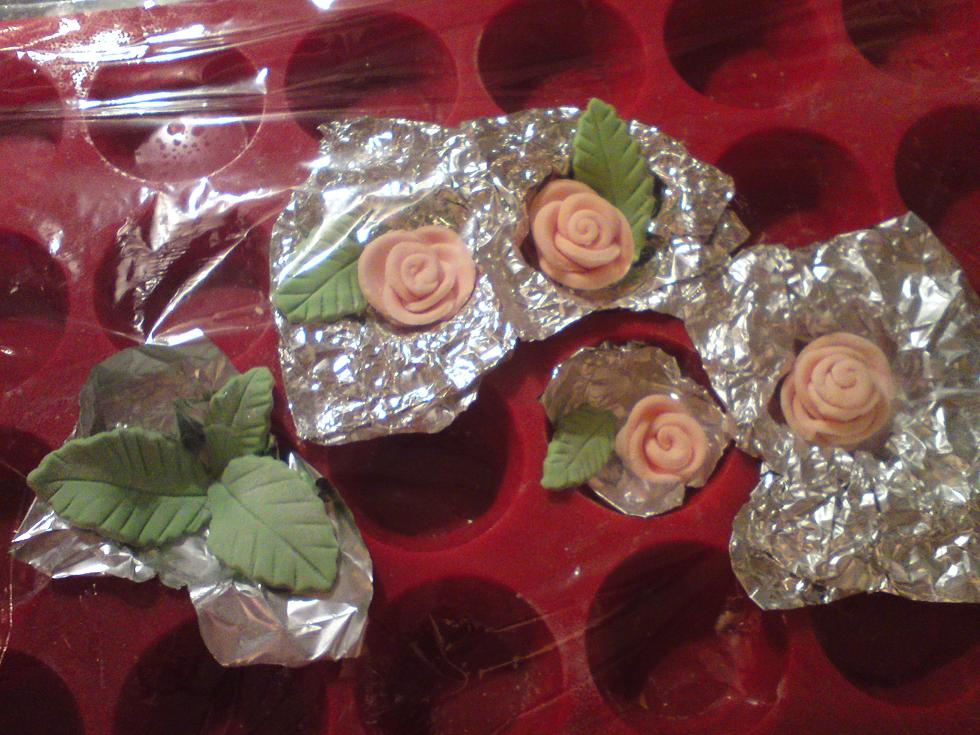
I made some roses and leaves from marshmallow fondant which I made by melting some marshmallows with a little water in the microwave and mixed with icing sugar until it forms a ball of fondant. You have to be very careful when melting the marshmallows and watch them like a hawk while they are in microwave (as I discovered! I was talking to my brother and forgot about them and they bubbled up and exploded in the microwave making it huge gluey mess!!!!)
I tried to make the roses like Ive saw the paper ones with a 5 petal flower cookie cutter but this didn't really work as the fondant gets too sticky the more you handle it. So i used the flower cutter and used one of the petals to cut out 8 or 9 individual petals and shaped them into a rose. it was very fiddly and time consuming but for my first attempt they turned out ok. For the leaves I used a round pastry cutter with the jagged edge and cut a half circle then cut it again to form a leave then used the back of a knife for the veins.


The cake was very lumpy and hard to cover with the rolled icing. I have been watching alot of "Cake Boss" on TV and I love the cakes they make. I am only a beginner when it comes to cake decorating but my mam was so pleased Id made the effort and it was a surprise. The cake was make from 2x 8" round cakes stacked with Jam and butter cream in each layer. I covered the full cake with cutter cream them covered the cake in rolled icing. It was very hard to get the icing to roll to the size of the cake so I did a bit of a bodge job and icied in panels. The pink trim is the marshmallow fondant. I used the left over butter cream with some red food die to to the shell border and the writing as you can tell I dont have a very steady hand.

All in all the cake was pretty tastey even tho it wasnt a master peice :-)

Saturday, 18 December 2010

More Christmas Cooking

Another batch of Christmas cooking as I was feeling under the weather today and didn't feel creative enough to make any cards.


I made using a Betty Crocker Strawberry Supreme cake mix some mini and standard cupcakes and what was left over I made an 8" cake but once I had finished decorating the cupcakes I didn't have much icing left!!


The mini cupcake cases have gingerbread men printed all over them and I bought the mini gingerbread men sugar toppers in America. I also had a few plastic holly toppers from a bought Christmas Chocolate log we bought the other day.


The 8" looks a little sad with little icing but I put butter cream and strawberry jam inside and used the rest of the gingerbread men to finish the top off. 

The cake mix went a long way I was very surprised how much it actually made out of one box!!

It made an 8" cake, 6 standard cupcakes and 10 mini (2 of the minis had to be eaten while they were warm LOL!)

They are delicious I wanted to make a big one with cream and fresh strawberries but I couldn't wait to buy the cream and strawberries. I also have a Lemon cake box and a Betty Crocker cookie mix there so I will be making more soon.

Take Care All
xx

Thursday, 16 December 2010

Christmas Cooking

This is what I have been up to tonight!!

I decided to make some cookies for my team at work as a little thank you for all the hard work they have been doing.


These are Sugar Cookies

Ingredients:
3 cups (390 grams) all purpose flour
1/2 teaspoon salt
1 teaspoon baking soda
1 cup (227 grams) unsalted butter, room temperature
1 cup (200 grams) granulated white sugar
2 large eggs
2 teaspoons pure vanilla extract

In a separate bowl whisk together the flour, salt, and baking soda.
In the bowl of your electric mixer (or with a hand mixer), beat the butter and sugar until light and fluffy (about 3 to 4 minutes). Add the eggs and vanilla extract and beat until combined. Add the flour mixture and beat until you have a smooth dough.
Divide the dough in half and wrap each half in plastic wrap. Refrigerate for about one hour or until firm enough to roll.
Preheat oven to 350 degrees F (177 degrees C) and place rack in center of oven. Line two baking sheets with parchment paper. 
Remove one half of the chilled dough from the refrigerator and, on a lightly floured surface, roll out the dough to a thickness of 1/4 inch (1 cm). (Keep turning the dough as you roll, making sure the dough does not stick to the counter.)  Cut out desired shapes using a lightly floured cookie cutter and transfer cookies to the prepared baking sheet. Place the baking sheets with the unbaked cookies in the refrigerator for 10 to 15 minutes to chill the dough which prevents the cookies from spreading and losing their shape while baking.
Note: If you are not going to frost the baked cookies, you may want to sprinkle the unbaked cookies with crystal or sparkling sugar. 
Bake cookies for about 8-10 minutes (depending on size) or until the edges are just starting to brown. Remove from oven and let cookies cool on baking sheet for a few minutes before transferring to a wire rack to finish cooling. Frost with royal icing, if desired. Be sure to let the royal icing dry completely before storing. (This may take several hours.)
Frosted cookies will keep several days in an airtight container. Store between layers of parchment paper or wax paper.
Makes about 36 - 4 inch (10 cm) cookies.

You can cover with Royal Icing sugar but I don't like Icing on cookies so I melted some white chocolate and added green food gel and using a piping bag and small nozzle tip piped a border around then filled in.


This is the first time I have made cookies and big Adam has ate 4 before I decorated as he's not a fan of white chocolate. He likes them and he is still alive!!

I had a bit of an incident when I was making them I slipped on some flour on the floor and pulled the bottom cupboard door off and hurt my hand. Adams response - "you've broke the door!!" not are you ok!!! Typical bloke.

Guess what? I still haven't finished my Christmas cards!! I was going to do them tomorrow night after work but I am going to see a psychic with my mam and nan so that should be interesting!

Take Care All

Sam x